Baking with the Ingredients on our Shelves

Amazing how much life has changed in the last few weeks.  Last month, if we were wanting to make a recipe, and came up short an ingredient or two—it was simply an inconvenience as we stopped and made a quick run to the store to get what we needed.

Now—not so much.  We think twice or three times before heading to the store, and then there is no guarantee that we will FIND what we want at the store.  So–what to do?  Sometimes a judicious substitution will yield amazing results.

Some examples:

I love to bake bread, and have a recipe that I use for toast and sandwich bread.  It called originally for melted butter.  One day I was elbow deep into the recipe—and came up short on butter.  OLIVE OIL to the rescue.  I subbed 1/4C olive oil for the 1/4C melted butter—and fell in love with the results.  I never looked back.

The same recipe calls for honey as a sweetener.  I never seem to have enough on the shelves when I want it—but I did have some pure maple syrup.  These days it’s a toss-up as to which I choose to use—they are equally good!

Buttermilk isn’t an ingredient many people keep on hand—and it is an easy one to sub.  For every cup of buttermilk called for in the recipe add 1Tbs white vinegar OR lemon juice to a measuring cup, bring up to 1C with milk (whole or 2% work best), and let it sit and curdle for a few minutes.

OR you can blend some plain yogurt with some milk to thin it slightly, and use that in lieu of buttermilk.  It may yield a more tender dough, but that really isn’t usually a problem.

I’ve subbed cottage cheese for ricotta in recipes, and vice versa.  The texture may vary slightly—but overall the flavor didn’t suffer.

Cocoa vs. Baking Chocolate—if you are in the position of having cocoa powder in the house, but NO baking chocolate—what to do?  For each ounce of baking chocolate (unsweetened), use 3 Tbs cocoa plus 1 Tbs butter OR vegetable oil OR shortening.  I’ve come to agree with several baking gurus that the flavor achieved using cocoa is a richer, deeper, more intense flavor than the flavor you get with baking chocolate.  Cocoa powder is chocolate in its purest form—and you get to choose the type and quality of fat to add to the recipe!

For other substitutions, check out this list:

https://www.myrecipes.com/how-to/ingredient-substitutions

Flavor Layering

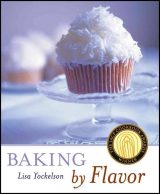
Flavor Layering and flavor pairingsA couple of years ago I read a review on–and subsequently purchased–a book called Baking by Flavor, by Lisa Yockelson. In it, she argues that flavor intensity isn’t achieved by simply adding ‘more’. Rather, it is achieved by layering or building level upon level of similar flavors that can work together, resulting in something that is far more than simply the sum of its individual parts.

Let’s look at something as basic as a creating a lemon scone. You could simply add some lemon extract to your dough and call it done. This rarely gives you the lightness and brightness we’ve come to associate with lemon flavors. To achieve that brightness, you can zest a lemon, and add the zest to the dough. If you want to kick it up a notch more, you can soak the zest in some lemon juice for a few minutes before adding it to the dough. Buttermilk (a standard ingredient in our scones) also helps intensify the lemon flavor because it has an acidic bite. Brush the warm-from-the-oven scones with a lemon glaze–or sprinkle with lemon-flavored granulated sugar–and now your taste buds can’t help but notice that with every bite, they have a pop of bright, fresh lemon flavor.

Chocolate is another flavor that layers well. Different types and forms of chocolate include cocoa powder, semi-sweet chocolate and bitter-sweet chocolate. Add a jolt of vanilla to chocolate and you intensify and develop the final chocolate flavor. Think a rich, moist chocolate cake filled with a chocolate mousse and glazed with a rich (and not too sweet) chocolate ganache, and you’ve got the picture.

Her book is a wealth of information. It includes charts of flavors and suggestions about what partners well with what. There is also a section on kitchen tools, along with tips and recipes. She explains everything well enough that you don’t have to be a trained pastry chef to enjoy the book.

It’s fall–and it’s time to bake!

The Art of Quick-Bread Baking

buttermilk biscuitsMuffins, scones and biscuits all fall into the category of ‘quick breads’. However, don’t be confused, they are NOT breads, and they use completely different skills and techniques.

If I had to distill my advice on quick breads down to one or two comments only, it would be this:
1.  For scones and biscuits–cut in frozen butter. Then add the buttermilk quickly, while handling (mixing) the dough as little as possible.
2.  For muffins–first, blend or cream the butter, sugar and eggs thoroughly. Then, when adding the flour and dry ingredients–do this as gently and minimally as possible.

WHY?  Here is what ultimately separates bread baking from quick bread baking. When you make bread, the more you knead the dough the better it becomes.  But with quick breads the more you ‘work’ the dough or batter, the tougher and more rubber-y it becomes.  The reason is the same for all, and the culprit is gluten.  Bread thrives on well-developed gluten to give it its structure and characteristic ‘chew’. Gluten develops as you knead the dough.  When you make quick breads, you do NOT want gluten to form. Thus, you handle or ‘work’ the dough or batter as little as possible.

How does this translate into practice? It means that when you make quick breads, you work the liquid and dry ingredients together by hand, with a spatula. Run your spatula around the bowl and along the bottom, scooping from the bottom and bringing it up to the top to be sure that the dry ingredients get combined into the liquid.  Continue doing this until the dough/batter JUST begins to come together–and quit!

Fill the muffin tins–or turn the scone/biscuit dough out onto a floured board and cut your scones. Done!

No Soggy Bottoms (and other scone making tips from the Brits!)

I occasionally pick up books on scones. Sometimes I do this for reference, sometimes looking for flavor ideas, and sometimes, well, just because. After all, I can’t claim to have grown up with a Scottish granny who taught me all her secrets, so everything I know about scone making has been learned by reading and the trial and error method of baking.

I recently purchased The National Trust Book of Scones (that would be the National Trust of the UK), and want to share some of the author’s tips on scone making. Some should sound very familiar!

1. Work quickly and lightly throughout–do NOT overwork the dough.

2. Turn the dough out onto a lightly floured surface to prevent it sticking. When patting out your dough, do not press too hard as this may prevent the scones from rising to their full height.

3. If using a cutter (ie. a round biscuit cutter), press STRAIGHT DOWN–do not twist. This should help the scones rise evenly, rather than bind at one side and bake lop-sided.

4. Line your baking sheet with either parchment paper or Silpat.

5. Scones need to go into a preheated oven. The baking time is short and they need to start baking immediately.

6. When you take your scones out of the oven, transfer them to a cooling rack to prevent ‘soggy bottoms’.

and lastly. . .
7. Always eat scones fresh–on the day of baking. But we all knew that, didn’t we???

Baking Temperature: When you’re hot. . .or not!

Oven temperature. . .we’re talking oven temperature here!

I have baked hundreds of scones in the last decade. So, when a friend asked me to bake scones for her daughter’s wedding shower, I agreed. This would be fun AND easy. Make the dough up in advance, and get up early enough to bake before leaving for the shower.

The first batch into the oven was ‘plain’ Original Recipe. I preheated the oven to 405 degrees (it runs hot so this is the setting that gives me 425 degrees). The scones came out of the freezer, were set onto a parchment lined cookie sheet, placed into the oven. I set timer for 18 minutes and moved on.

At the end of 18 minutes, I checked the oven and was horrified! My scones had spread laterally, and had minimal rise. The bottoms of the scones were suspiciously white, and there was a puddle of melted butter around each scone. In short, they were not baked.

I second-guessed everything I did. Did I prep the dough correctly? (YES) What had I done differently? Then I looked at the problem again. The scones were not baked. So, I found the oven thermometer and put it in the hot oven to confirm the oven temperature. Sure enough, my oven was running at a mere 360 degrees rather than 425 degrees. This is not nearly hot enough to properly bake scones. I made a simple adjustment to the settings and the next two batches of scones baked up perfectly. They had a nice rise, good color, and baked within the normal baking time.

a side by side comparison showing the effect of the wrong oven temperatureLook carefully–the scone on the right baked at the unexpectedly lower oven temperature. It is flatter and more spread out. It was very tasty, but it didn’t have the same light texture or appearance as the scone on the left.

Scones and biscuits both need a hot, quick bake. The high, quick heat is needed to turn that butter into nice steamy air pockets without leaving pools of butter on the cookie sheet.

As for my temperamental oven? A faulty igniter (gas oven) is the culprit, and repair is scheduled next week.

Baking Temperature-when hot is TOO hot!

In checking voice mail messages one evening, I had a message from someone who was clearly upset. She left a message asking about the baking temperatures listed in our directions. She thought the temperature listed was too hot.

I called and asked her what had happened. She’d made the dough and baked all the scones. The bottoms of all her scones were either scorched or burned. I told her that the baking temperatures were correct as listed, but did she have time for me to ask her a few questions. I was reasonably sure I knew what had happened, but you know what they say about assumptions.

My questions were:
1. Did the parchment paper turn tan? (YES)
2. Did you make up the dough, cut the scones and put them on the cookie sheet to bake, and then begin pre-heating the oven? (YES)
3. How cold was the butter when you started making the dough? (refrigerator temperature)

The primary issue here is the answer to question 1. The fact that the parchment paper turned tan is a good indicator that the oven was running hot. I don’t know why many ovens, mine included, age this way, but they do. As they age, they may run true to temperature in the mid-temperature ranges, but as you get higher than 400 degrees, will run too hot. The easy solution for this is to purchase an oven thermometer and do some simple checking of your oven settings. For my oven, I set the temperature back 20 degrees to 405, and now my scones bake correctly.

There were other factors, however, which contributed to the problems with her scones. Letting her cut scones sit on the parchment paper while the oven preheated gave the butter time to warm and seep into the parchment paper. Likely there was a nice buttery spot under each scone before those scones went into the oven. As soon as the heat hit that spot, the butter scorched, causing the bottoms to burn. (And by the way, she did NOTHING wrong by starting with refrigerator temperature butter. While even colder butter is better, the real problem was the time spent waiting to for the oven to preheat.)

If you find out that you forgot to start the oven preheating, just pop the scones into the freezer while the oven heats, and then replace the parchment paper with a fresh sheet before baking.

Here are a few “ounce of prevention” baking tips:
1. If you are baking something for the first time, bake as few as possible for the first batch, and set the timer for the minimum time called for by the recipe. This lets you make sure both the temperature and time settings are accurate.

2. If you are baking one cookie sheet of scones, cookies, or biscuits–set the rack to the central position in the oven.

3. If despite your best efforts they still scorch slightly, double up your cookie sheet. Just the little bit of extra insulation on the bottom does wonders!

As for my unhappy caller–it is always disappointing to take out your finished creation and discover it not what you anticipated. Creative thinker that this woman is, she sliced off the bottoms of the scones, served them anyway, and explained that they were lower in calories without the bottom crust!! And since the first words out of my mouth had been “we need to replace that bag for you”, I’m now looking forward to hearing about her next batch of scones!

How to cut in frozen butter–and NOT slice your fingers to shreds in the process!

Frozen butter vs. Cold Butter. It matters.

I confess. For years I made these scones prior to starting Victorian House Scones, and did not use frozen butter. Did I use cold butter straight from the fridge? Yes, but more often it was cool butter that sat on the counter for 10-15 minutes. After all, it is SO much easier to cut it in when it is just slightly cooler than room temperature vs. COLD. And my scones? They were, of course, very good. Sometimes even excellent. But were they outstanding? Not very often. Then I started working with frozen or nearly frozen butter. The difference is remarkable, and it is remarkable enough that I’m becoming the poster child for frozen butter.

So the question is: How do you get frozen butter into the mix without slicing your fingers to shreds? Or without ending up with an aching arm because it was so difficult to work in the icy cold butter? I have two recommendations–both work equally well, so the choice is yours.

1. Use your mixer. If you own a stand mixer such as a KitchenAid, you can use the mixer to work pats of butter into the flour mixture. Add the pats of butter to the bowl containing the mix. Then attach the flat paddle and turn the mixer on low. It will quickly and easily work the butter into the flour mixture, leaving you with small nubbins of butter. The overall texture will resemble coarse corn meal.

It is very difficult to safely slice a stick of frozen butter. Instead, take the butter out of the refrigerator, cut it into pieces, and then freeze the butter in single recipe portions. When you are ready to bake, the butter will be waiting for you.

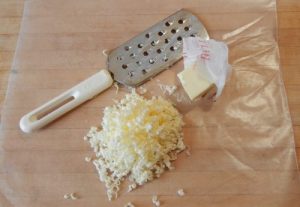
2. OR–use your cheese grater. Grate up the proper amount of butter for a batch of scones (1-1/2 sticks for a retail bag, 3 sticks for a commercial bag), onto a sheet of wax paper. Wrap it up gently and place the grated butter in the freezer for a at least 20 minutes. You can grate several recipe-size batches of butter in advance, wrap them, and freeze them for future use. When you are ready to bake, take out a package of grated butter and add it to the dry ingredients in the mixing bowl.

how to make scones-grated frozen butterOnce the grated butter is in the mixing bowl cut it in with a pastry cutter. It takes less than 10 passes to fully work the butter into the flour mixture. This technique is truly amazing!

No matter how you choose to incorporate the butter, the next step is adding the liquid. Gently blend the buttermilk into the butter/mix blend. Be very careful not to over-work the dough.

One word of caution–using very cold butter and cold buttermilk seems to result in a need for additional buttermilk to get all of the flour/butter blend moistened and worked into a ball. This is normal–so slowly add (by tablespoons) enough buttermilk to achieve a workable ball of dough.

Frozen Butter and Scone Dough–some Chilling Facts

Many recipes (including the directions for making our scones and biscuits) call for using chilled or frozen butter.

Lets face it–frozen butter is. . .cold. Hard. Difficult to slice, and difficult to work with. It is SO much easier to work with butter that is warmed to room temperature, or even melted. So WHY make the extra effort and time and use frozen butter?

Lauren Chattman, author of The Baking Answers Book, says the point in using chilled butter is so that it doesn’t melt during dough assembly. Let the butter melt in the oven, not on your kitchen counter. AND frozen butter takes up more physical space than melted butter. When it melts during baking, it creates an air pocket. The melting butter also releases steam, and that helps expand the air pocket, which ultimately helps the dough rise. What happens if the butter melts before being placed in the oven? You lose those pockets of air and steam, the dough doesn’t rise well, and you have denser scone or biscuit.

Start with a chilled bowl, which keeps everything cold. Add the dry ingredients to the bowl, and cut in cold or frozen butter. There are two easy ways to do this. One is with a mixer or food processor. The second is to pre-grate and freeze the butter, and then use a pastry cutter.

If you use the food processor or mixer, pulse or run it until most of the butter is broken down to rice-size pieces. Then gently stir in the COLD buttermilk, quickly pat out the dough and cut your scones. I add the buttermilk by hand, rather than with the mixer. No matter how careful I am, the mixer overworks the dough. It only takes an extra minute or two to add the liquid by hand, but it makes a big difference in the lightness of the scones.

how to make scones with frozen butter--grating butter firstThe second way to cut in frozen butter is to grate the needed amount of COLD butter, wrap it up gently, and freeze it. When you want to make scones, add the frozen grated butter to your bowl, and use a pastry cutter to cut it into the dry ingredients. This happens quickly and efficiently, and is only method I use to cut in frozen butter. Finish dough assembly by adding your buttermilk, gently patting out the dough and cutting your scones.

And then–FREEZE the DOUGH. When you are ready to bake, preheat your oven. Once preheated, line a cookie sheet with parchment paper, and remove the dough from the freezer. Put the frozen scones or biscuit on a cookie sheet, and put it in the oven. In a very few minutes, you can be enjoying gloriously light scones or biscuits!

Fruit-full Scones

I’ve always known that these particular scones are not only versatile–but incredibly forgiving. In all the years I’ve made them, I’ve only had a few notable complete failures. (Rhubarb scones really didn’t work well!)

I confess that I was amazed when I first made the pineapple scones using the crushed pineapple to replace most of the buttermilk. They had a fabulous subtle flavor, but the texture of the scone itself remained true. The same held true when we created the apple-cinnamon oatmeal scones by subbing applesauce for the bulk of the buttermilk.

So, OK, I’m a bit slow to realize that this concept carries over to a variety of fruits. But eventually the light flashes brightly enough for me to figure this out. So, may we present: Fruit-full scones.

Apricot Scones are fruit-full sconesShown here is my first “experiment”–apricot scones. For this, I took a can of apricot halves in juice–and pureed the fruit only in my food processor–leaving visible small chunks. It measured out to just a little less than one cup (the amount of liquid needed for a retail size bag)–so I added enough buttermilk (or juice) to bring the volume up to 1 cup.
I made the Original Recipe scones as directed–cutting in the butter–but using the apricot puree instead of the called-for buttermilk. I did need to add an extra tablespoon or two of liquid to compensate for the chunks of fruit–but by adding it in single tablespoon amounts, I didn’t over-liquify the dough.

Pat out the scones, cut them–bake immediately if desired–or freeze the dough to bake later. Fabulous (and easy) apricot scones. And–according to my cadre of guinea pigs–the taste is fresh and light–the texture is identical to our “standard” scones.

My suggestion–use any soft fruit (or fresh soft fruit) that you choose, and have FUN! We’ve tried apricot and peach (and tested the peach with the Indian Chai scone mix–I also think it would be very tasty as the backdrop for the Gingerbread scones). Get creative, have fun, and make fruit-full scones!

Recipe cards for BOTH retail and commercial bags can be found on our Mix Instructions page.